Customize Your Online Clock: TimeScreen Settings & Help
Welcome to your comprehensive guide to mastering TimeScreen. You’ve discovered the simplest way to transform your browser into a stylish and functional online clock, but the real power lies in its customization. How do I display a clock on my screen that perfectly matches my workflow, aesthetic, or presentation needs? This guide will walk you through every setting and feature, ensuring you can unlock your perfect time display and troubleshoot any common issues along the way.
We designed TimeScreen with a core philosophy of simplicity, but understanding its settings panel is key to harnessing its full potential. Whether you're a student needing a distraction-free study clock, a streamer designing a unique background, or a professional keeping a meeting on track, this guide provides the help you need.
Dive into TimeScreen Settings: Customize Your Online Clock
Your journey to a personalized time screen begins in the settings panel. This central hub has all the tools you need to adjust the clock’s appearance and behavior. Let's explore how to access it and what each option does, allowing you to create the ideal display for your screen.
Accessing Your Personalization Panel
Finding your settings is straightforward. Upon visiting the TimeScreen homepage, you'll see the clock displayed with a set of minimalist icons at the bottom of the screen. To open the main customization menu, simply click on the gear icon labeled "Settings." This action will slide open the personalization panel, revealing all the powerful options available to you. Its intuitive design keeps customization just a click away without cluttering your view. Consider this panel your command center for timekeeping.
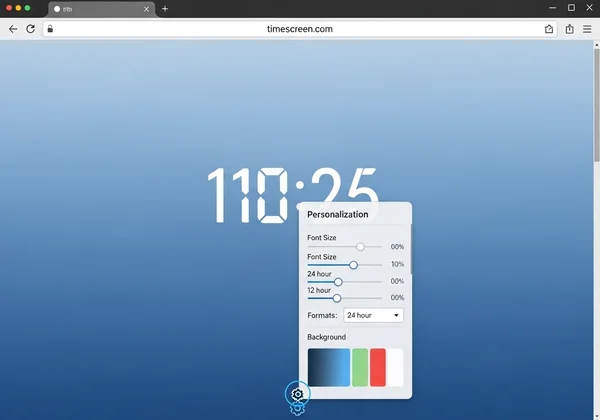
Essential Clock Adjustments: Format, Date, and Seconds
Once inside the settings panel, you'll find the core functional adjustments. These display options control how time information is presented, ensuring your clock is practical for your specific needs, whether for global standards or personal preference.
Here’s a breakdown of the essentials:
- Time Format: You can effortlessly switch between a 12-hour (AM/PM) and a 24-hour clock format. This is crucial for users who prefer military time or live in regions where the 24-hour system is standard.
- Show Date: With a single click, you can toggle the visibility of the current date. This is perfect for users who want a comprehensive view of time or prefer a cleaner look with only the hours and minutes.
- Show Seconds: For tasks requiring precise timing, such as presentations or focused work sprints, you can enable the seconds display. For a more serene, minimalist view, you can easily hide them.
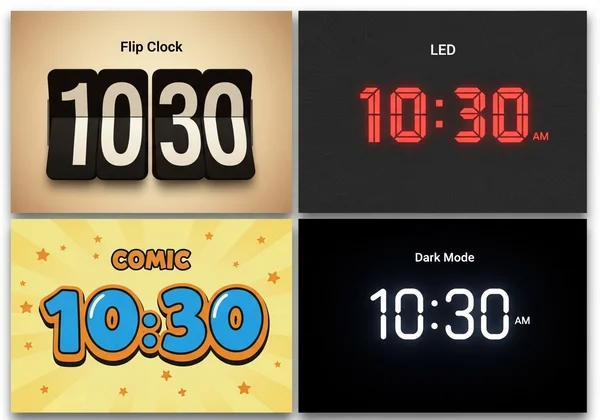
Exploring Aesthetic Clock Themes & Dark Mode Options
Here's where TimeScreen truly comes alive. Beyond simple functionality, the platform offers a curated selection of aesthetic clock themes to match any style. Whether you're a creative professional like Jenna who needs a clock that complements her stream's vibe or a student like Mark who wants a visually pleasing study tool, there is a theme for you. You can choose from styles like the retro Flip Clock, the modern LED display, a fun Comic theme, or a classic Analog face. Each theme completely transforms the look and feel of your screen clock.
Plus, the dark mode option is fantastic for productivity and eye comfort. Activating dark mode inverts the color scheme, providing a high-contrast display that is perfect for late-night study sessions or low-light environments. It reduces eye strain and helps maintain focus by minimizing glare. We encourage you to try the clock themes and find the one that best suits your mood and environment.
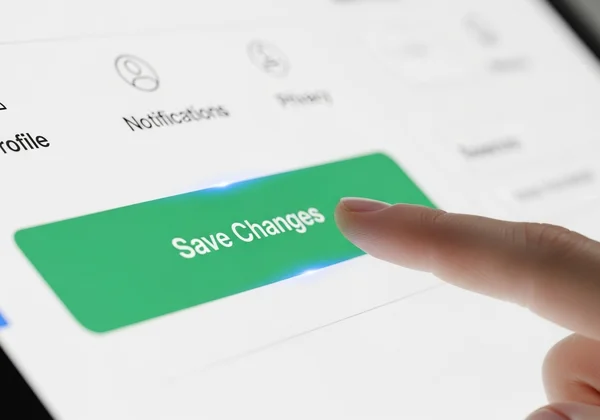
The "Save Changes" Essential: Why It Matters for Your Custom Time Screen
A crucial step in customization is clicking the "Save Changes" button. Many users wonder why their settings don't stick after they refresh the page. This is not a bug; it's a feature designed to protect your privacy. Understanding how this works is key to a smooth experience.
Understanding Local Storage for Your TimeScreen Settings
TimeScreen is built with a privacy-first approach. Unlike many online tools that store your preferences on their servers, we use your browser's local storage. This means all your custom settings—your chosen theme, time format, and color preferences—are saved directly on your own computer. This method enhances your privacy because we never collect or analyze your personal data or preferences.
Because of this local storage model, you must explicitly tell the browser to save your choices. The "Save Changes" button is the command that writes your settings into your browser's memory. This is how settings work on our platform to ensure your data remains yours alone, providing a secure and trustworthy experience every time you visit.
Step-by-Step: Ensuring Your Settings Stick
To make sure your personalized clock appears every time, follow this simple process. Remembering these steps will prevent frustration and make using your customizable clock seamless.
-
Open Settings: Click the gear icon to open the personalization panel.
-
Make Your Selections: Adjust the theme, format, date, and any other options to your liking.
-
Confirm and Save: Before closing the panel or navigating away, click the prominent "Save Changes" button at the bottom of the menu.
- Reload with Confidence: Once saved, your settings will automatically load the next time you open TimeScreen in the same browser. It’s that simple!
Troubleshooting Common Issues & Getting Online Clock Help
Even the most intuitive tools can sometimes present challenges. If you run into issues with your settings or need specific guidance for advanced setups, this section provides the online clock help you need. We've compiled solutions to the most common user questions.
My TimeScreen Settings Aren't Saving: Quick Fixes
If you've clicked "Save Changes" but find your settings are not being remembered, the issue likely lies with your browser's configuration. This is one of the most common browser local storage issues. Here are a few quick fixes to try:
- Check Browser Settings: Ensure your browser is not set to clear cookies and site data upon closing. Local storage relies on this data being persistent.
- Disable Conflicting Extensions: Some browser extensions, particularly privacy blockers or ad blockers, can interfere with a website's ability to save data locally. Try disabling them for our site to see if that resolves the issue.
- Clear Your Cache: In rare cases, an outdated cache can cause conflicts. Clearing your browser's cache for our site may help resolve persistent issues.
How to Reset Your TimeScreen to Default Settings
Changed your mind or want to start fresh? Resetting your TimeScreen to its original state is incredibly easy. Simply open the "Settings" panel and look for a "Reset to Default" or similar option. If one isn't available, an alternative method is to clear your browser's site data specifically for TimeScreen. This action will erase any saved local data, reverting the clock to its default theme and settings the next time you visit.
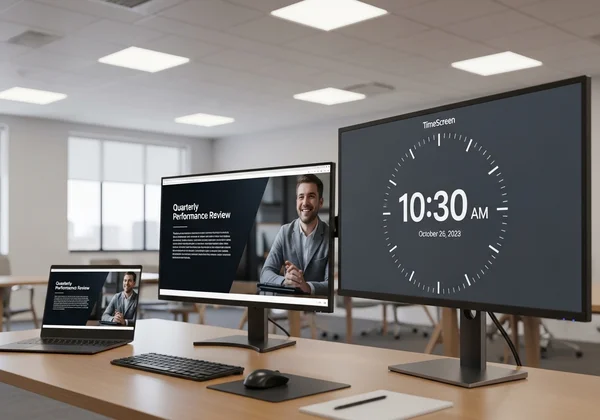
Optimizing TimeScreen for Multi-Monitor Setups & Presentations
TimeScreen is a powerful tool for professionals and multitaskers. For streamers like Jenna or meeting facilitators like Linda, using a second monitor clock is a common need. To do this, simply open our online clock in a new browser window and drag it to your secondary display. Then, click the fullscreen icon at the bottom of the screen to create an immersive, dedicated time display.
This is also the perfect method for a display clock for presentations. It provides a large, clear, and professional-looking clock for all attendees to see, helping you manage your time effectively without cluttering your presentation slides. Get your full screen clock ready for your next meeting in seconds.
Your Time, Fully Customized and Always Accurate
You now have all the knowledge needed to transform TimeScreen from a simple clock into a fully personalized productivity and design tool. By mastering the settings panel, understanding the importance of the "Save Changes" button, and knowing how to troubleshoot common issues, you are in complete control of your time display.
We built TimeScreen to be simple, stylish, and always accurate, empowering you to create the perfect clock for any situation. We encourage you to go to the site now and start experimenting. Discover the perfect theme, set your preferred format, and create a realtime clock that is uniquely yours.
TimeScreen Settings & Usage FAQs
How do I customize my online clock on TimeScreen?
Customizing your online clock is simple. First, visit the homepage. At the bottom of the screen, click the gear icon labeled "Settings" to open the personalization panel. Inside, you can change the theme (e.g., Flip, LED, Comic), switch between 12/24 hour formats, show or hide the date and seconds, and activate dark mode. Once you've made your selections, you must click the "Save Changes" button to apply and store them for your next visit to our online tool.
Why do my TimeScreen settings not save automatically?
Your settings don't save automatically to protect your privacy. TimeScreen uses your browser's local storage to save your preferences, meaning no data is ever sent to our servers. This design choice requires you to give explicit permission to save the settings by clicking the "Save Changes" button. This ensures your choices are stored securely on your own device and puts you in full control of your data.
Is TimeScreen a free online clock with diverse themes?
Yes, absolutely. TimeScreen is a completely free online clock. We believe everyone should have access to a simple, stylish, and functional timekeeping tool. We offer a variety of unique and aesthetic clock themes at no cost, including Flip Clock, LED, Comic, Digital, and Analog styles. Explore all the options on our free time screen to find the perfect look for your desktop, presentation, or study session.
Can I use TimeScreen as a full screen clock on my second monitor?
Yes, using TimeScreen on a second monitor is one of its best features. Simply open the clock in a new browser window and drag that window over to your second monitor. Once it's positioned, click the "Full Screen" icon located at the bottom of the clock's interface. This will expand the clock to fill the entire screen, creating a dedicated and highly visible desktop clock perfect for multitasking, streaming, or presentations.